Thursday, 3 May 2012

A walk through the Lime Yards in Ticknall

Hi All,


Between the village of Ticknall and the grounds of Calke Abbey near Derby there are some interesting photographic opportunities in the shape of the old lime workings. There are several interesting pools of water, a long tunnel, bridges and woods etc. 


Map of the area
In March on a cloudy Saturday afternoon my son Ben and I took a walk from the village hall in Ingleby lane over the main road and up the footpath to the beginning of the walk. Starting at the old tunnel we walked to the Calke Abbey visitors centre and then back through the woods to Ticknall village and finally back to the car park at the village hall. 

During the walk I took the opportunity to try some off camera flash shots in the tunnel, some panoramas down by the pools and also over the tops towards Calke. I also tried a few potential black and white shots. 

Some of my favourite shots can be seen below and the rest of the shots can be seen in the gallery on my website at www.carrington-imagery.co.uk .

This B & W shot was taken at the start of the walk looking over towards St. Georges Church across the fields. The shot was taken in RAW then processed in CS5 then converted to B&W using Niksoft Silver Efex Pro.


St Georges Church


As you reach the top of the path you arrive at the entrance to the old tunnel. 

Tunnel Entrance


The shot below was taken looking towards the tunnel entrance. I took a meter reading of the light at the entrance and then illuminated the walls of the tunnel with an SB910 speedlight stood on a small tripod at my feet. The image was given a boost by using Niksoft Color Efex Pro.

Inside the tunnel looking towards the entrance


The shot below was taken looking towards the tunnel exit. I took a meter reading of the light at the exit and then illuminated the walls of the tunnel with the pop-up flash in commander mode with the SB910 speedlight stood on its tripod just in front of Ben.

Ben at the tunnel exit

The shot below was taken looking towards the tunnel exit. The meter reading was taken for the light at the exit and then the SB910 speedlight was used at 1/125th  power to gently illuminate the ceiling. Niksoft Color Efex Pro was used to create a dual tone effect.

Ben in silhouette


This shot of the old bridge by the Lime Workings seemed to lend itself to a little vintage processing using Silver Efex Pro

Bridge by the Lime Workings


First of several panoramas. Three shots were combined in CS5 using the photomerge command. 

Pool Panorama


 Another panorama of the smaller of the two pools at this point of the walk. The light was changing constantly as the clouds cleared and the sun 

Pool Panorama


Panorama of the footpath crossing the field looking towards Ticknall with Foremark reservoir to the right.


Footpath from Ticknall


Black and white panorama overlooking Foremark Reservoir 

Foremark Reservoir

These are only a few of the shots I took on the day but as you can see it's an area that's well worth a visit. The grounds around the Lime Yards are extensive and can be quite dangerous. I can recommend sturdy footwear and a map. 

Monday, 23 April 2012

Creating a gritty portrait with Photoshop CS5 and Color EFEX Pro


Over the last few months my son Ben has become quite an accomplished guitar player. For his 18th birthday he bought a Charvel Desolation Single Cut DS-1 Floyd Rose guitar in Flat Black. It’s a spectacular guitar and I thought it might be nice to shoot a portrait session with him and the guitar.

I wanted to create the impression that he was being lit by a spotlight whilst maintaining the detail in the guitar. The lighting needed to be subtle but at the same time strong enough to bring out any detail.

I tried several different lighting set ups but finally settled on the one below.


I set up two speedlights. The first was a Nikon SB910 set to manual at ½ power. It was stood on a lighting stand through as 24” shoot-through umbrella. The light was positioned directly in front of him slightly higher than his face.

The second was a Nikon SB600 with a 22.5 degree grid. This was set on a stand and aimed directly at his right hand, set to manual and reduced to ¼ power.

Both speedlights were controlled using the pop-up flash on the D300s in commander mode.
I took a few test shots so that I could establish the optimum position for the lights to create the effect I was after. Shooting in RAW I decided to slightly underexpose the shot so that I’d have some room for movement when I got the image in Adobe Camera RAW.

Below is the start image in ACR. As you can see the effect is almost there. It just needed a few adjustments to bring out the detail.

Initial Image in Adobe Camera RAW
I lifted the exposure and also added a little fill light. I increased the blacks slightly and also added some clarity and vibrancy. The final ACR image is below. 

Adjusted Image in Adobe Camera RAW
After launching it into Photoshop CS5 it was now time to give it an edgy, gritty look. I decided to do this using Nik COLOR EFEX PRO4. There were a few filters I could have chosen but the one that gave me the look I wanted was the Bleach Bypass filter. Using the pre-sets I selected the one that I liked the look of and used it without any further tweaking.

Color Efes Pro 
Once back in CS5 the one thing I did notice was that the filter had exaggerated some of the defects in the wall behind my subject. I eliminated most of the larger defects using the spot healing brush but I chose to leave some a the smaller ones to add to the gritty look.  Lastly I added some Film Grain just to give it a final edge.

Final image adjustments in Adobe Photoshop CS5
This is the final image which came out pretty much exactly as I wanted it to. Very Pleased as was my subject. 

Final Image


Sunday, 8 April 2012

Shooting a Ladybird in Macro

Hi All,

The other day, whilst in the garden, I spotted (pardon the pun) a Ladybird on a bush. On closer examination I noticed that there were two of them, one under the other. I decided to have a go at photographing them so quickly ran inside the house to grab my gear.

Normally when I try to do this the subject either moves or leaves the area altogether so it was imperative that I moved quickly.

I set up my D300s with my Sigma 50mm macro lens and set the front of the lens as close as I could to the Ladybird without disturbing it. Unfortunately in order to get a good view I had to place the camera in such a position that the body cast a shadow on the subject. I tried a couple of exposures but it soon became apparent that some additional lighting was needed.

I set up my SB910 speed light on a tripod and manoeuvred is in to position just to the rear of the lens (shown below). Connecting the flash to the camera with an SC20 sync cord I set both the flash and the camera in manual mode and took a few test exposures. The ladybird didn't appear to mind, in fact the only reaction I got was that it repositioned itself slightly further along the branch then settled down again.

Camera and flash setup
Naively I hadn't realised just how shiny and reflective a ladybirds wings were. On examining the test shots on the monitor I found that the exposure was reasonable but the flash head could be seen quite clearly on the wings.

I fastened a diffuser dome to the SB910 and took a few more test exposures until I reached a compromise between reflection and exposure. I also noticed that whilst the speedlight was causing a reflection it was also bringing out some of the detail on the wings which was a good thing. After a few more exposures I settled for f22 @ 1/60 second, ISO100 and the flash set at 1/4 power.

My favourite shots of the set are below.


The rest of the images from the set can be found in the Nature gallery on my website at www.carrington-imagery.co.uk


Monday, 26 March 2012

Radar Love 22nd March 2012 at the Venue, Derby

Hi All,

Back in May ago I went along to the Shakespeare Inn here in Derby to photograph a music event called Fontana Sound System.  At the time I'd never photographed a band in concert and had no idea what to do. In the finish I decided to use my SB600 flash which, in hindsight, was a mistake. Admittedly the pictures came out fine but the flash had illuminated the band in such a way that the atmosphere created by the on-stage lights was lost. Thankfully the bands concerned seems pleased with the pictures so all was not lost. 

Last week I had an opportunity to photograph some more bands in concert at a small club in Derby called the Venue. The bands in question were; The Black Fuzz, The Kickliner and Whitemoor. This time I decided to take a different approach with the photographs. This time I wanted to capture the concert atmosphere. The big problem photographing concerts is that the bands are illuminated by multicoloured lights, quite often through a haze. The reflected light emitting from the band, although bright to the eyes, isn't too bright as far as the camera is concerned. This means opening up the lens and ramping up the ISO. This in turn gives virtually no depth of field so consequently problems getting a focus and of course noise on the image. 

Luckily I'd watched a couple of tutorial videos by Jared Polin of froknowsphoto.com fame. In his tutorials he shows how to use open lenses and high ISO's to the photographers advantage. With this information in mind I went along to the gig with a different perspective. I also went along equipped with a Rogue Grid which I purchased at Focus on Imaging. The idea being that if I did want to use a flash then I'd set it up with a Grid to narrow it in such a way that it would illuminate the subject but leave the background lit by the on-stage lights. 

During the gig I tried all sorts of different combinations of Lens, ISO, Shutter Speed, Aperture and Grid settings. I've posted a few examples of the images taken below. The details are given under each image. The rest of the images can be found in the gallery on my website www.carrington-imagery.co.uk.  

As always, click an image to see it bigger,

The Black Fuzz (ISO 500, f4, 1/160", 50mm)

The Black Fuzz (ISO 500, f2.8, 1/250", 50mm) 

The Black Fuzz (ISO 500, f3.5, 1/250", 50mm with Grid) 

The Black Fuzz (ISO 500, f2.8, 1/125", 44mm with Grid) 

The Kickliner (ISO 1000, f2.8, 1/80", 50mm) 

The Kickliner (ISO 2500, f4, 1/250", 34mm) 

Whitemoor (ISO 1600, f2.8, 1/100", 50mm) 

Whitemoor (ISO 1600, f4, 1/100", 50mm with Grid) 

Whitemoor (ISO 800, f8, 1/100", 80mm with Grid) 
Whilst I'm not the best band photographer in the world I was quite pleased with the outcome and VERY pleased with the way the the grid worked.. The Grid was in its stacked setting giving a narrow beam at 16 degrees which seemed to do the trick. 

Thursday, 15 March 2012

Out Of Bounds Effect (Gavin Hoey Technique)

Hi All,

Back in May last year (2011) I visited the World Superbike Championship at Oulton Park in Cheshire. Whilst I was there I took the opportunity to take a lot of photographs. On the whole they came out really well and I was very satisfied with the results.There was one particular photograph (below) that I really liked but for some reason it lacked punch. 


Original Image
As with all of these sorts of images I put this one on the hard drive and forgot about it. Then on evening I was looking through various tutorials on the internet when I came across an Out Of Bounds Technique devised and presented by Gavin Hoey. The tutorial was on YouTube and it can be found on the link at the end of this post. 

I won't go into the details of how this effect is done as Gavin explains it better than I ever could. The reason why I'm posting this is because if I can make this effect work then anyone can and I encourage you to give it a go. Follow the steps in the tutorial and you can't go wrong. This was my first attempt at this but it won't be my last. It's just a case of finding a suitable image. 


Final Image

The YouTube tutorial by Gavin Hoey can be found here LINK 


My thanks to Gavin for another wonderful tutorial. 


Thursday, 8 March 2012

Focus On Imaging 2012

Hi All,


On Monday 5th of March 2012 a couple of friends and I took a trip over to the NEC to visit this years Focus on Imaging exhibition. 

We had a great day, in fact, virtually 8 hours of walking around, viewing the new products and of course watching the various talks and demonstrations.

As you would expect all of the usual exhibitors were in attendance although Sony were conspicuous by their absence as indeed was Adobe's large stand. However there was plenty to look at. This year I decided to take along the Nikon Coolpix S3100 bought for me by my kids for Christmas and take a few pictures.

We arrived pretty early ans were inside the hall by 10:05. At that time the hall was pretty slack and we were able to move around really easily


View down the Hall
The first talk we watched was hosted by Rogue and presented by Bjorn Thomassen Daymen and demonstrated how models can be photographed by simply using speedlights and Rogue modifiers.
Rogue Lighting 


As we continued we stopped in on a lighting demonstration by Westcott once again showing the correct way to light models using soft-boxes and reflectors. The shot below was taken using my S3100 and the light provided by their soft-box. 


Taken using the light from the soft-box
One of the most impressive stands in the hall was the Nikon stand. With the new D800 and the D4 having just arrived there was plenty to look at. It was nice to see the D4 in the flesh and also see it being used. Nikon provided video demonstrations by several well known photographers.

watching the Nikon demonstrations

Demonstrating the Nikon D4
As the day progressed we continued to watch the tutorials and demonstrations. At midday we made our way to the Colour Confidence stand to watch Gavin Hoey as he gave a Photoshop Tip & Tricks tutorial including how to use the Nik software products such as Color Efex Pro. 

Gavin Hoey
Gavin Hoey
As the day drew to a close we stopped in on one last talk. This one was being given by photographer Drew Gardner. Drew showed us how he took some of the images included in his Golden Greats "Britain's oldest Olympic Gold Medallists" collection. This included how Drew sunk a Manfrotto tripod into a swimming pool !!!

Drew Gardner

All in all a great day was had by all. I only wish I could have attended the other days too. My thanks go out to all those who organised the event and to those professionals who put together the talks and tutorials. Roll on Focus 2013 !

Sunday, 12 February 2012

Autumn Composite

Remember : Click an image to see a larger version


Hi All,

It's been a while since my last post. That's because I've been getting used to my new PC and I've also been trying to catch up with post processing some of the image I took towards the end of 2011. 

During the Autumn months I took the opportunity to go out and about and collect some leaves. My idea was to try to capture the leaves as they took on the Autumn colours. I managed to find a tree that had begun to shed its leaves. On the floor beneath the tree the leaves were piling up. Some of them were still green whilst others had begun to turn brown. 

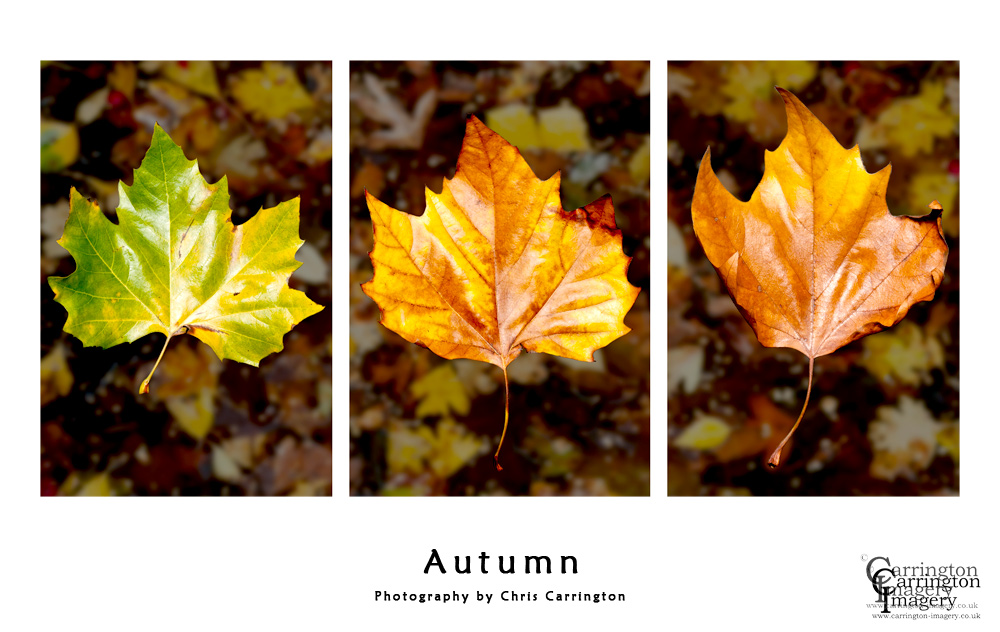
I managed to find three leave that I liked the look of. The first was still green but with a hint of brown, the second was brown but flat and the last was brown and curling at the edges. 

The first job was to photograph the individual leaves. I decided to photograph them against a mat black background to avoid reflections. I then set up my SB600 flash above directly above then to produce as little shadow as possible. I also added a Lastolite softbox to further reduce shadowing and also to give a slightly softer light than the flash on its own. 

The three leaves I shot can be seen below.


Once I'd got the images into Photoshop my first task was to separate then from their black background using the Quick Selection and Refine Edge tools. I'd already decided that I wanted to  create an autumnal triptych (three images on one sheet). I had a triptych template already selected but when I added the leaves the final image seemed a little stark. The leaves needed a background. A couple of years ago I'd shot a collection of autumnal leaves that were floating in an animal feed trough (seen below). So I decided to use that for my background

Background


I brought the triptych, the three leaves and the background image into Photoshop and work on them. I added a very slight Gaussian blur to the background to make each leaf stand out. I also added a text layer with the word 'Autumn' placed in the centre at the bottom of the image. I also added some text about the photographer.... me !!

Below is a screen shot of the layers in Photoshop 

Photoshop Screen
Once I was happy with the image I saved it off as a jpeg, printed and framed it. The image below is the final image. For some reason the watermark has appeared twice on the blog image but it doesn't on the final print. 
Final Image