Sunday, 12 February 2012

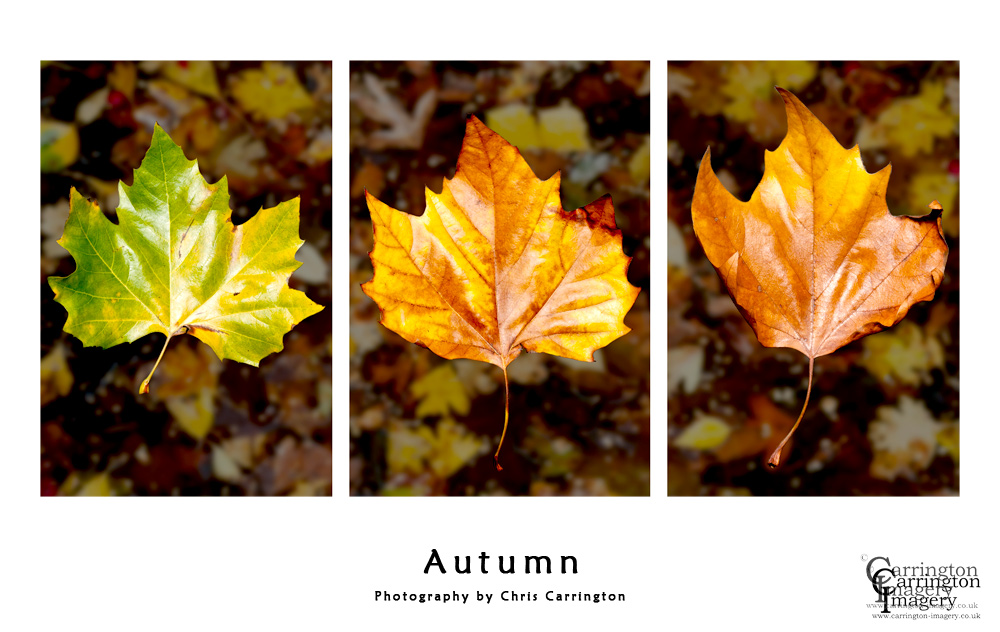
Autumn Composite

Remember : Click an image to see a larger version


Hi All,

It's been a while since my last post. That's because I've been getting used to my new PC and I've also been trying to catch up with post processing some of the image I took towards the end of 2011. 

During the Autumn months I took the opportunity to go out and about and collect some leaves. My idea was to try to capture the leaves as they took on the Autumn colours. I managed to find a tree that had begun to shed its leaves. On the floor beneath the tree the leaves were piling up. Some of them were still green whilst others had begun to turn brown. 

I managed to find three leave that I liked the look of. The first was still green but with a hint of brown, the second was brown but flat and the last was brown and curling at the edges. 

The first job was to photograph the individual leaves. I decided to photograph them against a mat black background to avoid reflections. I then set up my SB600 flash above directly above then to produce as little shadow as possible. I also added a Lastolite softbox to further reduce shadowing and also to give a slightly softer light than the flash on its own. 

The three leaves I shot can be seen below.


Once I'd got the images into Photoshop my first task was to separate then from their black background using the Quick Selection and Refine Edge tools. I'd already decided that I wanted to  create an autumnal triptych (three images on one sheet). I had a triptych template already selected but when I added the leaves the final image seemed a little stark. The leaves needed a background. A couple of years ago I'd shot a collection of autumnal leaves that were floating in an animal feed trough (seen below). So I decided to use that for my background

Background


I brought the triptych, the three leaves and the background image into Photoshop and work on them. I added a very slight Gaussian blur to the background to make each leaf stand out. I also added a text layer with the word 'Autumn' placed in the centre at the bottom of the image. I also added some text about the photographer.... me !!

Below is a screen shot of the layers in Photoshop 

Photoshop Screen
Once I was happy with the image I saved it off as a jpeg, printed and framed it. The image below is the final image. For some reason the watermark has appeared twice on the blog image but it doesn't on the final print. 
Final Image


Monday, 9 January 2012

Creating a Festive Card

Hi All,


It's been a while since I last posted. That's because my old computer finally gave in and I had to get another one. I've been loading my new PC with all of the software that I need and also getting used to Windows 7 against Windows XP.  I'm getting there but very slowly. Must be my age I think.


Anyway, just before Christmas I decided to make a Festive scene that could be used as a Christmas card or simply just something to display around the house. 


I was very lucky in that a friend at work gave me a slice of Christmas Cake that she'd made and that really was the inspiration for the image. 


Using the Christmas cake, a Brandy Glass filled with cold tea, some baubles, a decoration in the shape of a penguin (tea light holder) and tinsel I set up the image. I set the brandy glass in the centre of the image with the cake to the right and the penguin to the left. I put the baubles at the back and placed the tinsel all around the scene. At the back of the set up i used a piece of black card so that the individual parts of the scene would stnad out. 


I required two shots for the final picture. The first shot was taken with a large aperture F4.5 so that the baubles would be slightly out of focus.  I used a Nikon SB600 flash through a 24" shoot through white umbrella to soften the light. The second shot was taken at the same aperture but with no flash and the small candle lit. The idea was to capture the flame. 


Once inside Photoshop CS5 I blended the tow images together so that I could see the flame on the candle. I also warmed the image up slightly in Camera Raw so that there would be a warm festive glow about it.


Finally I added some festive text saying a simple "Merry Christmas" and a small white stroke for a border. 


Picture in CS5 with adjustment layers

Final Image


Monday, 12 December 2011

Cyclo Cross 2011

Remember : click an image to see a larger version


Hi All,


On the 27th of November 2011 I was invited along to the National Cyclo Cross Championships at the Moorways Stadium in Derby to take some photographs of the event.


I attended an earlier stage in the championship in January 2011 and at that time I tried my hand at generally photographing the cyclists without any real agenda. 


This time I decided I wanted to concentrate more on the cyclists themselves rather than their bikes and gear. I wanted to capture the expressions on the faces of those taking part. 


As the main (Senior) event was taking place mid-afternoon I was a little concerned about how much light was going to be available to take some decent portrait shots. I decided to go to the stadium and into the wooded area where the main part of the course was going to run. It was immediately apparent that I was going to need a flash if I was going to have any chance of getting the shots I wanted. 


On the day I went along armed with my usual bag of gear. I'd already took the decision to use my Nikon 70-300mm lens and my SB600 flash unit. 


I initially put the camera on a monopod but in practice that made it very difficult to change orientation. I set up the camera in manual mode with an ISO of 200. I set the flash to manual and worked between the aperture and shutter speed to control the exposure. 


All in all I had a great day out. Four of my favorite shots from the day are seen here. 


Saturday, 12 November 2011

Creating a Panorama in Photoshop

Remember : click an image to view a larger version

Whilst out taking some photographs for a project called ABANDONED INDUSTRY I found myself photographing the old Rolls-Royce Main Works building on Nightingale Road in Derby. 

The building is pretty impressive and for years was the focal point for anyone visiting the company. The main entrance also housed the famous Battle of Britain stained glass window depicting a pilot with an eagle at his shoulders standing on a propeller overlooking the Rolls-Royce site.

Having taken the detail shots that I wanted I decided it would be cool to photograph the entire building frontage especially now this majestic building is surrounded by grey railings to keep out vandals.

The building frontage is enormous spanning about one third of Nightingale Road. However the width on Nightingale Road is that of a normal street which means that the photographer can’t get too far away from the building before bumping into the houses on the opposite side of the street.

From this position it is impossible to take in the full width of the building without an extremely wide angle or Fisheye lens, neither of which I possess.  I decided that the only way I was going to capture this building was to shoot a set of individual images and stitch them together in Photoshop to create a panorama. 

Using my Tamron 17-50mm f2.8 set at 17mm I found that if I stood at building centreline I could capture the full frontage in five individual shots.  The secret to shooting for panoramas is to ensure that each shot overlaps a little. This gives Photoshop a fighting chance of finding some detail to use to align and subsequently blend the images.


Having got my images onto the computer I fired up Photoshop and then selected File > Automate > Photomerge. I selected the five images below and left everything at the default settings.  Photoshop leapt into action (as much as it does on my PC) and about 3 minutes later I was presented with a merged Panorama on screen and a five layers with associated masks in the Layers Panel as shown below.


As can be seen, whenever Photoshop creates a panorama the final image is usually anything but rectangular in shape.  Dealing with this irregular shape is a matter of personal choice. It can be cropped, filled, cloned, etc. In this particular case I chose to use the transform tool to level the main image then I cropped it and used the clone stamp tool to fill in the few remaining pieces of empty frame.

The final result can be seen here. I’ve added a small, black stroke and some text to complete it.


Tuesday, 18 October 2011

Becki Thornber Studio Session

Remember : click an image to see a larger version.

I was recently asked by a friend of my daughter if I could shoot some portraits of her. She had recently had her hair coloured and she asked if it would be possible to emphasize her hair during the shoot.

During a recent eseminar organised by the Manfrotto School of Excellence photographer John Ricard explained how he lights models when the hair is of particular importance to his client. To emphasize the models hair Jon uses a hair light which is basically a light specifically aimed at the hair and balanced against the other lights on the subject.

Taking this idea I decided to try something similar. To light Becki’s face I set up a soft box about 1.5m from her and dropped its power down to 1/2 .  For the hair light I set up a strobe with a set of barn doors and dropped the power down to ¼ (shown below) . 


In practice I found that this setting was far too bright and put far too much light onto her. I adjusted the position of the light and moved it away from her hair but that spread the light a little too much. I managed to resolve the situation by putting a diffuser in front of the hair light and closed the barn doors in tight.

It took about 10 trial shots to get the lights and the exposure balanced before we set about starting the session.

In all I took 135 images of Becki from which she chose about 60. An example of the images I shot using this lighting set-up are shown below.

My thanks to Becki for her patience and for giving her permission to include them on this blog. 


Sunday, 16 October 2011

A Walk Around Mercia Marina

Remember : click an image to see a larger view


On the 2nd of October 2011 I decided to take a walk around the Mercia Marina near Willington in Derby. 

The marina is a photographers paradise with lots of different boats from narrow-boats to cruisers. Each boat has its own personality with boat owners painting and decorating their boats in their own unique way.

Rather than cart my entire bag of gear around I decided just to take my Tamron 17-55 and my new Nikon 55-300mm along with my Lowepro lens exchange bag which is one of the most useful bags I own.


The light was really strong especially with the reflections from the water so I also took a Cokin ND4 Graduated filter so that I could slow the light down if I needed to.

I spent a couple of hours wondering around the marina. A sample of the shots I took are below. As usual all of the shots I took are in my Photoshop.com gallery, a link to which can be found on the gallery page of this blog.


Sunday, 9 October 2011

DDCPSC Cheque Presentation

remember : click an image to see a larger version


In my previous blog post I was photographing the Charity Clay Pigeon Shoot held by the Darley Dale Clay Pigeon Shooting Club.

The idea of the shoot was to raise money for a worthy charity. This year (2011) the shoot was in aid of the East Midlands Air Ambulance service based at the East Midlands Airport.

On Friday 7th of October I was asked to take some photographs of two of the members of the DDCPSC as they presented the cheque for £1700 to the crew of the Air Ambulance. 

Whilst we were there we were also treated to a rare look around the base and the helicopter itself. Time was at a premium as the ambulance could be called upon at any time. 

Below are a few shots taken on the day. The rest of the shots can be viewed on my gallery the link to which cane be found on the gallery page of this blog. 


Kevin and Neil Davison present the cheque to the crew.
Air Ambulance
Rotor mechanism


Cockpit
Control Column